3D Texture LUT 🎨
Creating 3D LUT from .CUBE file
Svante Lindgren 2020-06-12
Introduction
A color look-up-table or LUT is used for color-grading your game. LUTs are often used because it eliminates the need to code multiple effects like contrast, curves, saturation etc. Instead a LUT lets you use programs like Photoshop or similar and all effects that comes with that program to color-grade your game. You can then export the LUT and use it in your engine.
How does this work?
A color look-up-table stores a color graded color for every possible color. So if you want your game to look less saturated you store less saturated colors in the table.
Actual colors

Look-up-table

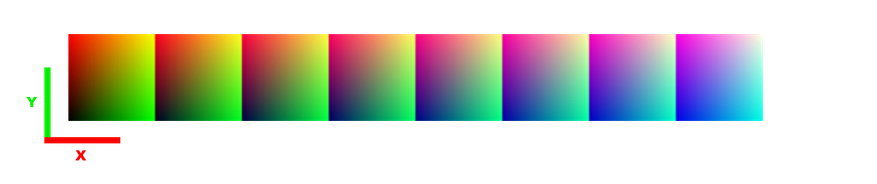
Look-up-tables are usually a 2D texture in game-engines and look something like the image below:
Why use a 3D look-up-table?
Look-up-tables always contain 3 dimensions of information for Red, Green and Blue. In a 2D LUT this is stored by having multiple images in one, as in the image above. The X value in each cube represents the Greens, the Y value represents the Reds and each cube has a different Blue.
Since the LUT has 3 dimensions it is logical store it as a 3D texture. Luckily OpenGL and DirectX supports 3D textures, which acts as a cube of colors instead of a flat plane.
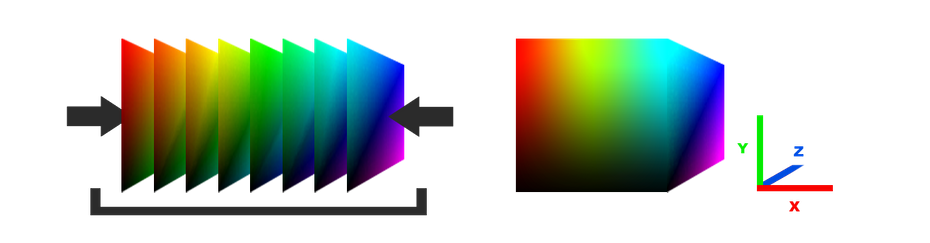
Having a 3D texture is good to use because it gives use 3D linear sampling for free. Linear interpolation between pixels is necessary because the LUT doesn't contain all 256^3 colors and more like 25^3 colors. Without linear interpolation there would be a significant loss of colors.
Using .CUBE files 📄
Since images are 2D we can't create a 3D texture from an image. Therefore we use a .CUBE file. These can be exported from the newer versions of photoshop and can easily be loaded in to create a 3D texture in your engine.
There are multiple file formats that store LUTs but we will use .CUBE since it has a formatting that is easy to read.
Formatting
.CUBE files contain two important keywords:
#LUT size: the next line contains the LUT size.
The size is defined when exporting the LUT from photoshop, and tells you the dimensions of the 3D texture. A larger number will also result in higher color precision.
#LUT data points: all new lines from now on will contain color data.
The data is stored in the CUBE file starting from color: R:0.0 G:0.0 B:0.0 and ends at color R:1.0 G:1.0 B:1.0. In this case when the size is 25, the first 25 colors represents the bottom X axis in the cube, we then increment the Y axis for every 25 colors, and increment the Z axis every 25^2 colors and so on.
below you can see an example of how a .CUBE file usually starts.
TITLE "BasicLUT"
#LUT size
LUT_3D_SIZE 25
#LUT data points
0.105882 0.113725 0.109804
0.117647 0.113725 0.105882
0.149020 0.109804 0.105882
0.188235 0.109804 0.113725
0.215686 0.113725 0.109804
0.243137 0.121569 0.101961
....
....
Loading the .CUBE file
Since images are 2D we can't create a 3D texture from an image. Therefore we use a .CUBE file. These can be exported from the newer versions of photoshop and can easily be loaded in to create a 3D texture in your engine.
There are multiple file formats that store LUTs but we will use .CUBE since it has a formatting that is easy to read.
// Load .CUBE file
printf("Loading LUT file %s \n", file_path);
FILE * file = fopen(file_path, "r");
if (file == NULL){
printf("Could not open file \n");
return false;
}
float* lut_data;
int size = 0;
// Iterate through lines
while (true){
char line[128];
fscanf(file, "%128[^\n]\n", line);
if (strcmp(line, "#LUT size") == 0){
// Read LUT size
fscanf(file, "%s %i\n", &line, &size);
lut_data = new float[size * size * size * 3];
}
else if (strcmp(line, "#LUT data points") == 0){
// Read colors
int row = 0;
do{
float r, g, b;
fscanf(file, "%f %f %f\n", &r, &g, &b);
lut_data[row * 3 + 0] = r;
lut_data[row * 3 + 1] = g;
lut_data[row * 3 + 2] = b;
row++;
} while (row < size * size * size);
break;
}
}
fclose(file);
return true;
Creating the 3D texture
After loading all data we need to create a 3D texture to sample from in the fragment shader. This is done differently depending on what graphics API you use. In this example we use OpenGL.
// Create texture
GLuint texture;
glGenTextures(1, &texture);
glBindTexture(GL_TEXTURE_3D, texture);
// Load data to texture
glTexImage3D(
GL_TEXTURE_3D,
0,
GL_RGB,
size, size, size,
0,
GL_RGB,
GL_FLOAT,
lut_data
);
// Set sampling parameters
glTexParameterf(GL_TEXTURE_3D, GL_TEXTURE_MIN_FILTER, GL_LINEAR);
glTexParameterf(GL_TEXTURE_3D, GL_TEXTURE_MAG_FILTER, GL_LINEAR);
glTexParameterf(GL_TEXTURE_3D, GL_TEXTURE_WRAP_S, GL_CLAMP_TO_EDGE);
glTexParameterf(GL_TEXTURE_3D, GL_TEXTURE_WRAP_T, GL_CLAMP_TO_EDGE);
glTexParameteri(GL_TEXTURE_3D, GL_TEXTURE_WRAP_R, GL_CLAMP_TO_EDGE);
return texture;
Using the LUT
To use the 3D texture we want to sample it in the fragment shader, preferably in an after shader so all pixels on screen gets effected and to minimize sampling from the LUT.
In the fragment shader we need a uniform sampler of the current frame and the LUT.
// Sampling textures
uniform sampler2D frame;
uniform sampler3D lut;
The uniforms needs to be given an ID when initializing the shader and both of these need to be bound to the shader before using it.
// Initialize
glUniform1i(glGetUniformLocation(program, "frame"), 0);
glUniform1i(glGetUniformLocation(program, "lut"), 1);
// Needs to be bound every frame
glActiveTexture(GL_TEXTURE0);
glBindTexture(GL_TEXTURE_2D, frameTexture);
glActiveTexture(GL_TEXTURE1);
glBindTexture(GL_TEXTURE_3D, lutTexture);
Sampling the LUT in the shader is easy since the original color can be used as the coordinates/uvw for the LUT. All we need to do is sample the incoming color, then sample the LUT using that color as coordinates. This will then be the resulting color.
// Screen UV
in vec2 coord;
// Resulting color
layout (location = 0) out vec4 out_color;
// Sampling textures
uniform sampler2D frame;
uniform sampler3D lut;
void main(){
// Sample original color
vec3 color = texture(frame, coord).rgb;
// Sample LUT
out_color = texture(lut, color);
}
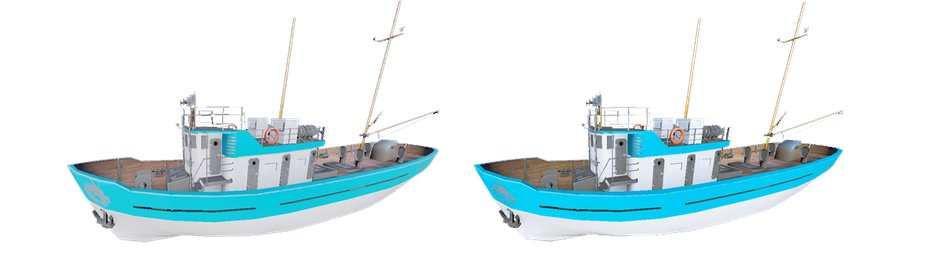
The resulting image is now color-graded using the LUT and can be drawn to screen.
You now have a really easy way of making your engine look great! Being able to color-grade in photoshop is super convenient and will speed up your workflow.